December 2009 Archives

25 words

| No Comments

The ninth annual summary of my year in 25 words, exactly.

Rose petals in blue sky and the scent of muddy elephants conducted me to presence. An intense upwelling of joy revealed the universe inside me.

Past years: 2008, 2007, 2006, 2005, 2004, 2003, 2002, 2001. Feel free to share your own 25 word summary in the comments.

Holiday transition

| 1 Comment

Xmas tree disassembled
The hardcover tree is back on the bookshelf.

I am always keen to finish Christmas as soon as possible. I gather up my gifts the morning after and put them away, write thank you notes without delay, and take down decorations for storage until next time.

Japan agrees with me and I love the change in the vibe of the city after December 25th as everyone moves on from Christmas romance to the family-oriented new year season. By the 26th, Christmas decorations are totally gone and replaced by pine and straw charms. For the next few days everyone is going to be cleaning, paying bills and tying up loose ends before the calendar flips to 2010. People in every situation are cheery and excited. The mood is festive and pleasant in a way pre-Christmas is not.

I am looking forward to visiting the temple on NYE for some warm sake and a bit of soup, then strolling around a nearly deserted city on the first and second of the month. So quiet and peaceful. But for now, I have some cleaning to do!!

No Shopping Report #9 - final

| 3 Comments

At the end of last year, I decided to try not buying anything except consumables for the whole of 2009. It was a pie-in-the-sky project with vague rules and no real consequences or penalties for failure. I blogged my progress and this is the final report.

The first few months sailed by smoothly. I restricted and restrained myself for about half a year without too much pain. I kept a wish list of things I wanted to buy but wouldn't. I retrained myself to not shop as a waiting game. The plastic smell of shops became unpleasant. My main failures were supplies - fabrics and hoop tubing - and gifts for friends and family.

When summer came, I gave in more easily to shopping temptations for myself. I bought some clothes and more fabric. Cosmetics sneaked into the house and so did a new pair of sneakers to support my sprained foot. I stopped keeping my journal in August. Autumn arrived with flurry of buying for Spin Matsuri, partially materials for the event itself and partially costumes for me. Our trip to Thailand and Singapore saw purchases of books and clothing. I replaced my filled up sketchbook with a new one. I bought an old, used telephone that I have wanted for years. And in the last month, I have caved in to the point that I bought all of my Christmas gifts and not many of them were consumables.

Shopping is a slippery slope. It is hard to put the brakes on and so very easy to get rolling again. Here is my scorecard, based on the original goals I stated last December.

No accumulation of things
Partial success. I ended up with more hoop costumes, hoops, makeup, and clothes than I started with but most of the durable goods I purchased were given away as gifts.
Purchase only consumables
Fail. See above.
Become mindful of my consumption
Success. However, consciousness and conscientiousness slipped later in the year.
Exercise creativity by repurposing what I already have
Partial success. I had a few good moments, like the shoe clips in May, but I found this surprisingly difficult.
improve skills in repair, maintenance, & construction
Partial success. Though I did repair and maintain things, I didn't do so with new or improved skills.
Build networks through bartering and trade
Partial success. I bartered and traded with friends as I always do, but did not build new networks.
Reduce my "ecological footprint" by decreasing waste and increasing the life of my things
Partial success. As an example, I eked another year out of our 12 year old mattress and put the 5 year old computer in for repair instead of replacing it.
Refocus my desires to more meaningful things, rather than an LED hula hoop
Fail. I still want hula hoops. They are meaningful to me.

Christmas Tree, 2009 - hardcover edition

| 10 Comments

xmastree-hardcoveredition.jpg

For the past nine years I've crafted a Christmas tree out of found objects, bits and pieces, useless odds and ends and occasionally a purchased item or two. This year, we had a box of books that we'd been trying to give away since the summer. A dozen hardcover castoffs became the foundation of the Christmas tree.

I am especially pleased with the way this tree turned out. But it was a 4-step process that took most of an afternoon, so I couldn't do the complete construction on Christmas Day in my usual tradition. Here's how it worked, in case you want to try one yourself.

Step 1: Drill This caused a bit of controversy in the household. Tod didn't want to hurt the books. I wanted to spike them so they wouldn't collapse. He went to work without a better suggestion and so I drilled the books by opening each book to its center spread, laying it page-side down and using a hand drill through the middle of the spine.

xmastree-painted.jpg
Mix and match painted covers

Step 2: Paint I silvered the edges of the pages with spray paint to make them consistent. The titles ranged from Great Grillin' to a 1963 children's edition of the Canterbury Tales and the covers were a range of tacky and plain so I decided to paint them with a mix of green acrylic paints. Because I like the artwork on the Canterbury Tales, I left that one unpainted and dry brushed any of the beige books to coordinate, while giving good coverage to the blue, black and red tomes.

xmastree-thread-lights.jpg
Spools of thread between books make space for lights

Step 3: Assemble This was a little bit harder than I expected. It took several attempts to get the spacing and shape right so I was sliding books on and off my dowel rod multiple times. The dowel I used was thin and flexible, so the tree leans a bit. I slipped a small spool of brown thread on the dowel after each group of three books. This enforced a few inverted Vs big enough for the lights.

tree-lit.jpg
Just like a real tree, I need to rearrange the lights - there are some dark patches!

Step 4: Light I topped the dowel with a cut-and-glued star made from a manila envelope, and tucked a string of colored bulbs in the spaces between books. This makes the tree glow gently in the dark.

Reduction Printing with Erasers

| No Comments

Reduction printing is a way to make multiple color prints in limited edition series. Unlike traditional block printing where each printed color is a separate piece of carved medium, in reduction printing you use only one block. As you work, you build up the colors of your final picture after carving away more and more of the print block. Because you are destroying the previous layer as you create the next one, the final prints can never be reproduced.

In this tutorial, you’ll work with a rubber eraser as your print block. There are instructions to make two different four-color designs in limited editions. You can download a PDF booklet of the instructions and add the necessary materials to create a mini craft kit to give as a gift. Or follow along here for your own fun crafternoon.

You will need:
two plastic erasers
one craft knife
four stamp pads (sky blue, green, dark blue, black)
printing sheets
tape
square

Print 1: House

reduction-2-completed.png
The completed House print

This is a simple four-color reduction print, where each new color adds detail to the layer below it.

1. Four an edition of ten prints, count out 14 printing sheets. I always print a few spares to compensate for the inevitable mistakes. Remember that you can never make more because you must cut down the block to finish the print.

reduction-2-sky.png
House: Sky Blue layer

Using your craft knife, cut away the area for the clouds as shown in the House: Sky Blue image. Print the sky blue ink once on each printing sheet. Allow to dry.

reduction-2-green.png
House: Green layer

Next, using House: Green as a guide, cut away everything that won’t be printed in green. This preserves the blue sky and creates a base for the house and tree. Paying close attention to aligning the colors (see note on registration below), print over your sky blue layer with the green ink. Print all the sheets and allow to dry.

reduction-2-blue.png
House: Blue layer

Now, using House: Blue as a guide, cut away the areas that will remain green, keeping what will be printed in blue. Print dark blue over the other colors, paying close attention to color registration. Allow the sheets to dry.

reduction-2-black.png
House: Black layer

Finally, with House: Black as a guide, cut away the areas that will remain blue, leaving only the house details and tree trunk. Print black over the other colors. Allow prints to dry.
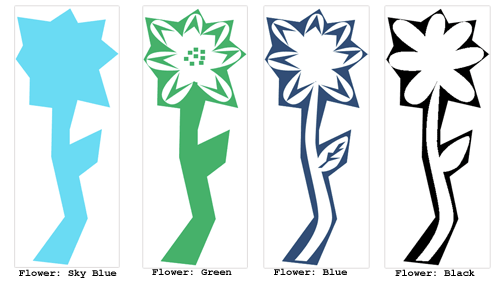
Print 2: Flower

reduction-3-complete.png

In this reduction print, details are added in multiple colors as the general shape is revealed.

Count out printing sheets for your edition. Remember that you need to make a few extras to cover any mistakes.

Cut away the white area as shown in the Flower: Sky Blue image, below. Print the sky blue ink as many times as you want prints. Allow to dry.

Using Flower: Green as a guide, cut away the center area of the flower, keeping the petal details and center of the flower. Carefully registering the block, print over the sky blue layer with the green ink. Print all the sheets and allow to dry.

Using Flower: Blue as a guide, cut away the stem, leaf, and center areas that will remain green. Print dark blue over the other colors, paying close attention to color registration. Allow the sheets to dry.

With Flower: Black as a guide, cut away the leaf and flower details that will remain blue. Print the final black over the other colors. Allow prints to dry.

reduction-3-guides.png

Note: Printing and Registration

registration.png

Aligning the color layers is critical to having a neat finished print. With small print blocks like rubber erasers, use the block as a rubber stamp. Tape each printing sheet paper to table to prevent it from slipping and align the corners of the print block to the previous color layers using a square.

Cheap materials

| 1 Comment

Sometimes I get so stuck on trying to do something well that I can't even get myself to begin. A few timid attempts result in the Inner Critic telling me I will fail, or be proclaimed a terrible fraud of a creative person, or any of the other clever and deadly things he taunts me with. But here is a good way to trick him into shutting up and getting out of the way while I create.

Use cheap materials. When I downgrade from fine drawing paper to copy paper, it's obvious to the Inner Critic that I am not doing anything important or worth criticising. If I draw with a gel pen or a Sharpie, I don't get nearly the same pokes as I do if I pick up a technical pen.

This won't work if I really do need to create something fine but 95% of the time I don't need permanence because I'm making a birthday gift or a sign or some silly whatever to amuse a friend. It is disposable creativity and so a Flair on notebook paper will work as well as a brush and canvas. Sure it won't last through the ages, but it doesn't need to.

The Inner Critic is so easy to fool sometimes.

Please do it at home

| 1 Comment

mannersheep.jpg

My interpretation of my own behaviour as part of the long-running series of train manner posters in the Tokyo Metro. Yes, I knit on the subway.

Cookies of Resentment

| 2 Comments

Thursday afternoon ÷ (1 kg flour + 575 g butter+ 3 1/6 cups assorted sugars + x) = 144 cookies + 1 resentful Kristen.

I enjoy traditions and celebrating the cycle of time so I try hard to embrace the whole year-end holiday season, but for much of it I am resentful and unhappy. I dislike the expectations and pressure I put on myself to produce my one-woman Christmas show every year. I shop; I decorate; I wrap; I cook; I bake. Mostly done alone unless I coerce, plead or break down.

I feel like a bitter old lady telling you this because resentment is not how I approach life in general and I wish I knew how to change myself. Maybe in the writing, a revelation will come. Or not; this is a problem I struggle with every year. I imagine this is completely shocking to you, since you love and embrace the holiday season with all your heart, curling ribbon, and glittery snowflakes.

One aspect of the festive season that often pains me is waiting too long to get things done. I'd love to make a mad and abbreviated dash through three or four days before Christmas, doing it all from shopping to decorating to celebrating and then be done. I've attempted it many times and it used to work, but each year's celebration gets a little bigger and more elaborate. Now this approach exhausts me and leads to mental and physical illness, so I decided to take it easier this year.

I baked cookies yesterday, 2 weeks in advance. But there was no holiday cheer in this task - it was practical and about as exciting as vacuuming the apartment, which I also accomplished yesterday.

Don't get me wrong, baking is fun. I love to concoct things and pop them in the oven. I adore sweets. But holiday baking is expected, though not demanded, and that seems to suck all the fun out of it. Of course there will be cookies and they will have been magically baked when no one is looking. There is no sweet surprise to spring on my darling.

"But you didn't have to do it!" he declared when I whinged about cookie baking last night. That is true, I didn't. Tod isn't all that interested in cookies. I don't think he even asked what I'd made or how many or expressed the slightest curiosity.

What would happen if there were no cookies? Superficially, nothing. Mostly I bake them to follow a tradition of ransoming Tod from his office on Christmas Day afternoon but Tod would still leave the office and his coworkers would barely remember a decade's worth of Christmas cookie deliveries. The problem is that at some point in the festivities, an innocent comment or question from Tod on the topic of cookies would tailspin me into guilt and shame at not providing sufficient holiday cheer.

So "possible guilt" trumps "definite resentment" and the cookies get baked. If they taste a little bitter, I apologise. I'll try to add more cheer next time.

How to wind a mini-spool from a cone

| No Comments

bobbin-spool.jpg

Now that I have a serger, I adapt a lot of my patterns to use it. Today I'm making a dress that can be 95% overlocked. But zippers and darts still need the conventional sewing machine and I want matching thread for these seams. Instead of buying a separate spool of thread, I've wound a mini-spool from my cone of overlock thread.

It's easy to do. Put the overlock thread cone in a coffee mug on the table behind the machine - this will prevent the it from bouncing around as it unspools. Use this thread to set up your bobbin-winding apparatus as usual and wind two bobbins from the cone. Use one in the bobbin case and slip the other over your machine's spool rod. Voila! enough thread to do darts, zippers, and hems.

Miracle Cough Syrup

| 2 Comments

Last night at 2 am, I had coughed myself awake for the 10th time and I needed some help. My medicine cabinet is pretty scant and there is no cough medicine. But the Internet rescued me with this cough syrup from a 1999 posting about a recipe in Herbally Yours by Penny C. Royal. I mixed some up, drank a tablespoon of it and went back to bed to sleep through the rest of the night. Miracle. It did the trick again this afternoon when I started hacking. I don't want to lose this recipe, so I am republishing it for myself.

The syrup is full of natural botanic medicine - anti-inflammatory, antihistamine, antiseptic, pain reducer. The mixture is spicy and sweet. The fiery cayenne warms the throat, the vinegar soothes the scratchy feeling, and the honey is delicious. In addition to cough suppressing, it might make a tasty marinade.

Miracle Cough Syrup
makes 4 doses

1/4 t cayenne pepper
1/4 t ground ginger
1 T honey (manuka, if you have it)
1 T vinegar (apple cider, if you have it)
2 T water

Put all ingredients in a jar with a watertight lid. Shake until blended. Take by the tablespoon to soothe and suppress your cough.

One sentence journal

| No Comments

journals.jpg

For the last few months I've been keeping a daily journal on paper where each day is a single sentence on a new page. I will cycle through my demiannual volumes year after year to add another sentence to the pages and build up an "on this day" style history.

It is a challenge to encapsulate the day in a few words. Some days are so full of excitement that the sentence reads like a forgettable laundry list. 22 October: Looked at shoes, suitcases, paper lanterns and fabric, then had a massage, swim, and found a caterpillar cocooning. The dull days are easier to write about because I can focus on a detail or an emotion. 6 October: Swirls and bubbly shapes in the dishwater brought me to tears with their beauty.

These words fix the day in my mind so I must write what I want to remember. Sometimes I hit the bullseye. September 19: A six km cross-town walk followed by boiled peanuts, strip Scrabble, and Soul Mining already makes me smile with the memory of that afternoon.

But I make mistakes. Though 22 October's Thai market, massage and swim were enjoyable, I have done them all before. What I really remember is the caterpillar: how we found it when it fell off a chaise near the pool; mistakenly thought it was trying to come out; got beer from our fridge and settled in to watch it for almost an hour before finally moving it to a safer place in the foliage.

Some days I don't know what to choose to remember. Today I heard that a childhood schoolmate recently died. Should I mention Laurleen and my feelings about her early demise (carpe diem; eat, drink, be merry), or should I write about whatever probably trivial things I do today?

And there is the issue of trying to fit in facts like names of people and places. I am aware that I might need context later on - even a few months down the road, I can't recall exactly who was at Sarah's birthday in September, but there it is in my one long sentence. In ten years' time, will I remember the people that go with the names? Does it matter?

Repetition will hone my skills at sentence-crafting and I am enjoying all its new considerations. But it leaves me wanting to write more, so perhaps I need a second journal without restrictions. Or to post here more often. Or both. We'll see.

Sci-Fi Hoop Dress Tutorial

| 1 Comment

hoopdress-leila.jpg
Leila rocks her hoopy dress with an LED hula hoop in the hem.

I made this bouncy dress for a friend who had a mission. I can't reveal what the mission was, but the dress was so fun that I want to share the technique with you. It's not a pattern, per se, as the dimensions will vary depending upon your fabric and hoop size.

You will need:

1 hula hoop
1 tank top pattern
2 meters 4-way stretch lycra, a bit more if you want a longer skirt.
1/2 meter stretch fabric for the top
1-3 meters stretch trim (optional)

Calculating
The trickiest bit of this process is calculating how wide the dress has to be at its widest point and along the bottom hem curve. You need to know how stretchy the fabric is and how big the hoop is.

hoopdress-math.jpg

Patterning
If you have a tank top pattern that you like, trace it out and adjust it to be empire length so that it ends just under the bustline. For a relatively flat chested girl like me, that's about 12 cm under the armpit. If you don't have a pattern you like, you can trace around a finished tank top that fits well. Don't forget to add a bit for seam allowances. Cut two tanks (4 pieces total) - one in the outer material and one in the lycra for a lining.

For the skirt, you'll do a bit of measuring (see below) using the calculations you did a few minutes ago. Pattern paper or newsprint comes in handy here! Don't forget seam allowances but you won't hem the skirt. When you have the skirt pattern measured and drawn, cut two pieces from lycra. Don't forget seam allowances.

hoopdress-skirt.jpg

Sewing
I use a serger/overlocker, but if you are using a regular sewing machine, be sure to use a zig-zag stitch to allow for stretch.

First construct the lined bodice. Sew the outer bodice together at the shoulder seams. Repeat for the lining. With right sides together, sew lining and bodice together around the neckline. Turn right side out.

Here is a nifty magical trick that lets you sew the armhole seams. Follow the diagram below. The neck adn armhole seams will be enclosed and the side seams will be open when this is done.

hoopdress-lining.jpg

Sew the left side of the bodice together; leave the right side open for now:

hoopdress-bodiceside.jpg

Sew the left side of the skirt together. Sew the skirt to the bodice, matching the side seams. If you are going to trim the dress along the bodice edge or at the hemline, do it now while the dress is flat. Sew the left side from hem all the way up the bodice and bodice lining.

Wearing
Slip the hoop into the dress and stretch the bottom hemline over the hoop. This can take some fussing, yanking and pulling as you want the hoop to be centered in the dress. You will have about 15 cm of fabric under the hoop as a shelf to hold the hoop in place.

Recent Comments

  • Rolex Watches: This group of pictures is so beautiful, thank you for read more
  • Robert Parent: I have learned to not let pass the subtle hints read more
  • Jenn(y): This is a good, goal-oriented way to approach the new read more
  • Tracey Northcott (@keitaigoddess): I am such a loser - sent off my cards read more
  • Tracey Northcott (@keitaigoddess): Hi Babe, Haven't seen you in ages it seems. Ash read more
  • https://www.google.com/accounts/o8/id?id=AItOawlBlcLTfxgMWRgxf2_TuNkGW8AwePJPekQ: Hi Kristen, Tell me about it. Our last (3 month) read more
  • Tracey Northcott (@keitaigoddess): "We deeply apologize to our customers for the heavy burden," read more
  • Carolyn Farwell: Oh the gif you've created is so funny! You have read more
  • Tracey Northcott (@keitaigoddess): I am going to miss you!! read more
  • Eric Smith: Hey Kristen: Met you on a train a couple of read more

Archives