Reduction printing is a way to make multiple color prints in limited edition series. Unlike traditional block printing where each printed color is a separate piece of carved medium, in reduction printing you use only one block. As you work, you build up the colors of your final picture after carving away more and more of the print block. Because you are destroying the previous layer as you create the next one, the final prints can never be reproduced.
In this tutorial, you’ll work with a rubber eraser as your print block. There are instructions to make two different four-color designs in limited editions. You can download a PDF booklet of the instructions and add the necessary materials to create a mini craft kit to give as a gift. Or follow along here for your own fun crafternoon.
You will need:
two plastic erasers
one craft knife
four stamp pads (sky blue, green, dark blue, black)
printing sheets
tape
square
Print 1: House
This is a simple four-color reduction print, where each new color adds detail to the layer below it.
1. Four an edition of ten prints, count out 14 printing sheets. I always print a few spares to compensate for the inevitable mistakes. Remember that you can never make more because you must cut down the block to finish the print.
Using your craft knife, cut away the area for the clouds as shown in the House: Sky Blue image. Print the sky blue ink once on each printing sheet. Allow to dry.
Next, using House: Green as a guide, cut away everything that won’t be printed in green. This preserves the blue sky and creates a base for the house and tree. Paying close attention to aligning the colors (see note on registration below), print over your sky blue layer with the green ink. Print all the sheets and allow to dry.
Now, using House: Blue as a guide, cut away the areas that will remain green, keeping what will be printed in blue. Print dark blue over the other colors, paying close attention to color registration. Allow the sheets to dry.
Finally, with House: Black as a guide, cut away the areas that will remain blue, leaving only the house details and tree trunk. Print black over the other colors. Allow prints to dry.
Print 2: Flower
In this reduction print, details are added in multiple colors as the general shape is revealed.
Count out printing sheets for your edition. Remember that you need to make a few extras to cover any mistakes.
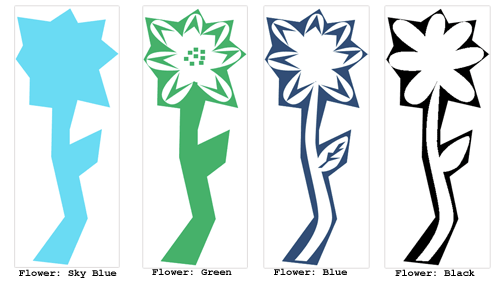
Cut away the white area as shown in the Flower: Sky Blue image, below. Print the sky blue ink as many times as you want prints. Allow to dry.
Using Flower: Green as a guide, cut away the center area of the flower, keeping the petal details and center of the flower. Carefully registering the block, print over the sky blue layer with the green ink. Print all the sheets and allow to dry.
Using Flower: Blue as a guide, cut away the stem, leaf, and center areas that will remain green. Print dark blue over the other colors, paying close attention to color registration. Allow the sheets to dry.
With Flower: Black as a guide, cut away the leaf and flower details that will remain blue. Print the final black over the other colors. Allow prints to dry.
Note: Printing and Registration

Aligning the color layers is critical to having a neat finished print. With small print blocks like rubber erasers, use the block as a rubber stamp. Tape each printing sheet paper to table to prevent it from slipping and align the corners of the print block to the previous color layers using a square.
Posted by kuri at December 17, 2009 07:17 PM