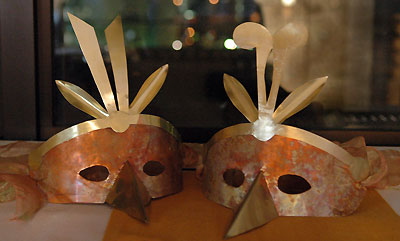
Copper and brass bird masks
I fashioned these masks for a masquerade ball we attended last week. They are rustic but elegant and not too difficult to make. And if you are careful not to dip your beak in it, you can sip a glass of wine or champagne while wearing your mask.
If you’d like to create one of your own, allow four or five evenings to cut, file, and assemble the mask. The cost of materials for two masks was under $20 (in Tokyo), not including tools.
Materials & Equipment
.2mm copper sheet
.2mm brass sheet
.45 mm copper wire
1.5 m soft ribbon
felt (optional)
pattern (2 MB PDF file)
construction paper
scissors
permanent marker
tin snips
drill with 0.8 mm bit & 2.5 mm bit
metal adhesive (“super glue” type)
paper clips (plastic covered ones prevent scratches)
large binder clips
half-round jeweler’s files, medium and fine
needle-nose pliers
wire brush
barbecue tongs
salt
gas flame
cold water
Design
I tested a few designs with paper, cutting them to fit my face, before I started in on the metal. The pattern I’ve provided is my original and you can see the marks I made on it as I worked out the shape. You will need to adjust it for your own face, especially the width of your nose and size of your eyes. If you adjust the nose area, don’t forget to reshape the beak to fit.
Cut
Trace the paper pattern onto the metal sheets with permanent marker. Cut the metal using tin snips. Use your larger bit to drill starter holes for the eyes and inside of the top feather, then trim them out with the snips. I drilled a hole on each side to accomodate ribbon to tie the mask on.
File
File the edges of all the pieces until they are smooth enough not to cut flesh, though the thin metal will remain fairly sharp. File in one direction with long strokes that curve slightly around the edge of the metal. File both sides of each piece. This step will probably take you the longest time. Don’t skimp on the filing or you will find the mask terribly uncomfortable to wear. Pay careful attention to the eye holes as they may have formed slivers or shards when you cut the inside curves. Blunt the tip of the beak well—it is easy to accidentally scratch someone with this protrusion.
Finish
Brass: Use long, straight strokes with the wire brush to dull the brass to a matte finish.Copper: I recommend experimenting with some scrap copper before you do this to the actual mask.
Prepare a large bowl of cold water. Hold the mask in tongs and heat it over a gas flame (I used the stove in my kitchen, doing half the mask at a time as the burner is not so wide) until it starts to turn dull but being careful not to let it heat to a brassy color—this can happen quickly, so learned to move the copper closer and farther from the heat to adjust. When the metal is hot, sprinkle 1/4 to 1/2 teaspoon of table salt on it while it is still over the heat. The salt pops and cracks, leaving the mottled blue colors you see in the photo.
A quick plunge into cold water cools the metal and washed off the excess salt. Repeat as necessary to finish the whole surface. Be sure to dry the mask well between saltings of you may end up with streaky, runny bits of salty blue across your mask.
Assemble
Step 1: Bend the side feathers into a shallow V or C to give them a bit of dimension. Glue the side and central feathers to the curved top band with metal adhesive. Clamp with paperclips or binder clips and allow to dry overnight.Step 2: With a 0.8mm bit, drill holes approximately 1 cm apart along the brass beak and drill corresponding holes on the copper. Fold the beak in half, using a file to keep the center line straight. Thread the pieces together with .45mm copper wire. The needle-nose pliers will help you tighten the wire as you go along. I found it helpful to temporarily thread the bottom hole on each side to keep the beak from slipping out of place.
Step 3: Glue the assembled brass top along the upper edge of the copper mask. Clamp with paper clips and allow it to dry overnight.
Fit
Thread soft ribbon through the side holes and tie behind. You will need to gently bend your mask to the curve of your face. The sides of the mask should touch your temples. You may wish to stick a bit of felt along the inside of the beak for more comfort.Posted by kuri at February 05, 2006 10:32 AMAn example of adjusting fit: Tod’s mask had to be reworked in two ways. I used the same pattern for both our masks, but his nose is wider than mine and his eyelashes longer. So I cut the threading that held the beak in place, trimmed and re-filed the inverted V nose space on the copper mask, and reattached the beak. Fortunately, I was able to trim within the drill line and didn’t need to make any new holes. I gave his mask a more prominent front-to-back curve by bending it and that seemed to pull the mask far enough from his eyes to prevent his lashes from touching it.
I love these. They’d have been great for Sweeney.
Posted by: Fran on February 6, 2006 07:09 PM